banner


How To Change The Battery Of My Moto G5 Android Phone

Introduction

Use this guide to replace the lithium-ion battery in your Motorola Moto G5 Plus. With daily use, a typical bombardment will last effectually 18-24 months before losing significant capacity. If your battery no longer holds a total charge or is causing unexpected shutdowns, you can follow the instructions below to restore your phone to skillful working society.

Before disassembling your phone, discharge the battery below 25%. A charged lithium-ion bombardment can catch fire and/or explode if accidentally punctured.

If your battery is swollen, practice not heat your phone and take appropriate precautions. If needed, you can use a dropper or syringe to inject isopropyl booze (90+%) around the edges of the display to weaken the agglutinative. Swollen batteries can be very dangerous, so clothing eye protection and do due caution, or take it to a professional if y'all're non certain how to proceed.

  1. Be sure to power off your phone before you begin. Use a SIM eject bit, SIM eject tool, or paper clip to remove the SIM card from your phone. Use a SIM eject bit, SIM eject tool, or paper clip to remove the SIM card from your phone.

    • Exist sure to ability off your telephone before you begin.

    • Employ a SIM squirt bit, SIM squirt tool, or paper clip to remove the SIM card from your phone.

  2. Prepare an iOpener and heat the front of the phone along its left edge for about two minutes, or until it's slightly too hot to touch. This will help soften the adhesive securing the display.

    • Fix an iOpener and heat the forepart of the phone forth its left edge for near two minutes, or until it's slightly too hot to bear upon. This will help soften the adhesive securing the display.

    • You may demand to reheat and reapply the iOpener several times to get the phone warm enough to cut the adhesive. Follow the iOpener instructions to avert overheating.

    • A hair dryer, heat gun, or hot plate may also exist used, but exist careful not to overheat the phone—the display and internal battery are both susceptible to estrus damage.

  3. In the following steps you will be cutting through the adhesive around the edge of the display assembly. Refer to the second and third images and familiarize yourself with the width of the adhesive around edges of the display. If you plan to re-use the display assembly, be particularly careful as you cut the adhesive on the sides of the phone. Don't insert your tool more than 2 mm into the phone, and angle it down (away from the display assembly) as much as possible.

    • In the post-obit steps you will be cutting through the agglutinative effectually the edge of the display associates.

    • Refer to the 2d and 3rd images and familiarize yourself with the width of the adhesive around edges of the display.

    • If yous programme to re-apply the display assembly, be specially careful as you lot cut the adhesive on the sides of the phone. Don't insert your tool more than 2 mm into the phone, and bending it downwards (away from the brandish assembly) as much as possible.

  4. Apply a suction cup to the display, near the middle of the left edge. Pull the suction cup with firm, constant pressure to create a slight gap between the display panel and the rear case. If the screen is cracked, the suction cup may not stick. In that case, try lifting with strong tape, or superglue the suction cup in place and allow it to cure so you can proceed.

    • Utilise a suction loving cup to the brandish, near the middle of the left border.

    • Pull the suction cup with firm, constant pressure to create a slight gap between the display console and the rear case.

    • If the screen is cracked, the suction cup may not stick. In that case, try lifting with potent tape, or superglue the suction cup in place and allow it to cure and so you can proceed.

    • If the display doesn't separate fifty-fifty with significant strength, apply more than heat to further soften the agglutinative and attempt once more. The adhesive cools quickly, so you may need to heat it repeatedly.

  5. Slide the tool along the left edge of the phone, cutting through the adhesive securing the display. As you move on to cutting the adhesive around the rest of the display, it may help to leave an opening pick in place here and grab another for the following steps. As you move on to cutting the adhesive around the rest of the display, it may help to leave an opening pick in place here and grab another for the following steps.

    • Slide the tool forth the left edge of the phone, cutting through the agglutinative securing the brandish.

    • As you move on to cutting the adhesive around the residual of the display, it may help to leave an opening pick in place here and grab another for the following steps.

  6. Slide the opening pick down and cut the adhesive around the bottom of the display. If the adhesive is too tough to cut, continue to heat it until it softens enough to cut fairly easily. Excessive prying or force used here could permanently damage the display or other components.

    • Slide the opening pick downwardly and cut the adhesive around the bottom of the display.

    • If the agglutinative is likewise tough to cut, continue to heat it until it softens plenty to cutting adequately hands. Excessive prying or force used here could permanently damage the display or other components.

    • Exist careful equally yous slide your pick around the height and bottom edges of the display. The display cables, fingerprint sensor, and fingerprint sensor cablevision are all housed fairly close to the edge of the display and can easily be damaged. Refer to this image to run across the verbal location of the cables.

  7. Continue cutting through the adhesive on the top and right sides of the phone. The proximity sensor, earpiece speaker, and front-facing camera are all located along the top edge of the phone, but are housed beneath the display unit. You shouldn't come into contact with any of them as you insert your pick to cut the adhesive. The proximity sensor, earpiece speaker, and front-facing camera are all located along the top edge of the phone, but are housed beneath the display unit. You shouldn't come into contact with any of them as you insert your pick to cut the adhesive.

    • Continue cutting through the adhesive on the top and right sides of the phone.

    • The proximity sensor, earpiece speaker, and front end-facing camera are all located along the height edge of the phone, but are housed beneath the display unit. You shouldn't come into contact with any of them as yous insert your pick to cutting the agglutinative.

  8. Once all the adhesive is cut, carefully lift open the display from the left edge. Don't fully remove the display yet. There are still cables connecting the display assembly that can rip easily. Prop the display unit at a 90 degree angle against a box to prevent the display and fingerprint cables from bending or tearing.

    • In one case all the adhesive is cut, advisedly elevator open the display from the left border.

    • Don't fully remove the display notwithstanding. In that location are still cables connecting the display associates that tin rip hands.

    • Prop the display unit at a xc degree angle against a box to prevent the display and fingerprint cables from bending or tearing.

  9. Remove the yellow sticker covering two of the black Phillips screws below the earpiece. Remove the yellow sticker covering two of the black Phillips screws below the earpiece.

    • Remove the yellowish sticker covering ii of the black Phillips screws below the earpiece.

  10. Remove the following Phillips screws from the midframe:

    • Remove the following Phillips screws from the midframe:

    • 16 iii.8 mm blackness screws

    • Three 2.4 mm silver screws

  11. Insert the flat end of a spudger between the midframe and the left edge of the phone and carefully pry to release the two clips holding the midframe in place. Insert the flat end of a spudger between the midframe and the left edge of the phone and carefully pry to release the two clips holding the midframe in place.

    • Insert the flat end of a spudger between the midframe and the left edge of the phone and carefully pry to release the two clips holding the midframe in place.

  12. Lift the midframe up and away from the phone. Lift the midframe up and away from the phone.

    • Lift the midframe up and abroad from the phone.

  13. Use the point of a spudger to disconnect the larger of the two display cable connectors. Use the point of a spudger to disconnect the larger of the two display cable connectors.

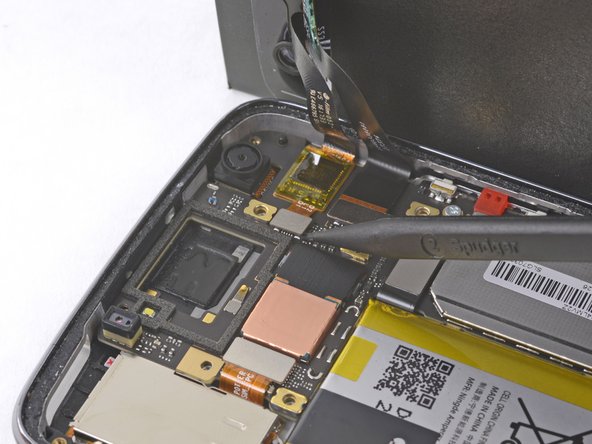
    • Utilise the signal of a spudger to disconnect the larger of the two display cable connectors.

  14. Disconnect the smaller display cable connector. This cable houses a display controller chip encased in yellow tape. You do not need to remove the yellow tape. The chip is lightly adhered to the motherboard, but should come up with minimal effort. Gently continue lifting the cable to break the adhesive seal and pull the cable away from the motherboard.

    • Disconnect the smaller display cable connector.

    • This cable houses a brandish controller scrap encased in xanthous record. You do not demand to remove the yellow tape. The bit is lightly adhered to the motherboard, just should come up upward with minimal effort.

    • Gently continue lifting the cable to break the adhesive seal and pull the cablevision away from the motherboard.

  15. At the opposite end of the phone, disconnect the fingerprint sensor cable. The fingerprint sensor cable is taped to a shield above it. As you lift the cable, lift the tape up with it. You can also remove the tape before disconnecting the cable.

    • At the opposite end of the telephone, disconnect the fingerprint sensor cable.

    • The fingerprint sensor cablevision is taped to a shield in a higher place it. As you elevator the cable, lift the record up with information technology. You can too remove the record before disconnecting the cable.

  16. Remove the display assembly from the phone. Before you reinstall the display assembly, thoroughly remove any remaining adhesive and glass from the frame of the device with isopropyl alcohol.

    • Remove the display assembly from the phone.

    • Earlier y'all reinstall the display assembly, thoroughly remove whatsoever remaining agglutinative and glass from the frame of the device with isopropyl alcohol.

    • Exist sure to plow on your telephone and exam your repair before installing new adhesive and sealing the display assembly.

    • If your replacement brandish doesn't take touch functionality and you're sure that it has been installed correctly, back upward your data and perform a factory reset.

  17. Remove the yellow tape covering  the battery connector. Remove the yellow tape covering  the battery connector.

    • Remove the yellow tape covering the battery connector.

  18. Use the point of a spudger to disconnect the battery by prying its connector straight up from the motherboard. Use the point of a spudger to disconnect the battery by prying its connector straight up from the motherboard.

    • Utilize the indicate of a spudger to disconnect the bombardment by prying its connector straight up from the motherboard.

  19. Peel back the black pull tab from the top of the battery and pull straight up with firm, steady pressure to break the adhesive holding the battery in place. The battery is held in place by mulitiple strips of adhesive. You may be able to break the adhesive using the pull tab, but if not, apply an iOpener to the back of the device to soften the adhesive and proceed to the next step. The battery is held in place by mulitiple strips of adhesive. You may be able to break the adhesive using the pull tab, but if not, apply an iOpener to the back of the device to soften the adhesive and proceed to the next step.

    • Skin dorsum the black pull tab from the top of the battery and pull straight up with firm, steady pressure to intermission the adhesive holding the battery in place.

    • The battery is held in place by mulitiple strips of adhesive. You lot may exist able to break the adhesive using the pull tab, but if not, utilize an iOpener to the back of the device to soften the agglutinative and proceed to the next pace.

  20. If your pull tab breaks or the adhesive is too strong to break, use an opening pick to gently pry the battery out of the case. Only pry from the edge of the device. Prying from any other side can cause severe damage to exposed components.

    • If your pull tab breaks or the adhesive is too stiff to break, use an opening choice to gently pry the battery out of the case.

    • Only pry from the border of the device. Prying from whatever other side can crusade severe damage to exposed components.

    • Once the bombardment is loose, remove information technology from the telephone.

    • Practise not reuse the battery subsequently information technology has been removed. The stress of removal tin can cause hidden damage to the bombardment cell, creating a potential safety take a chance. Replace information technology with a new battery.

    • To install a new battery:

    • Remove any remaining adhesive from the phone, and clean the entire area nether the bombardment with isopropyl alcohol.

    • Apply a few new strips of pre-cut adhesive or Tesa tape.

    • If you are attaching the battery with a custom-cutting adhesive, follow this guide.

    • Press the new bombardment firmly into place for five-10 seconds.

Team

Embed this guide

Choose a size and re-create the code beneath to embed this guide equally a small widget on your site / forum.

Preview

Source: https://www.ifixit.com/Guide/Motorola+Moto+G5+Plus+Battery+Replacement/100154

Posted by: francisstims1950.blogspot.com

0 Response to "How To Change The Battery Of My Moto G5 Android Phone"

Post a Comment

Iklan Atas Artikel

Iklan Tengah Artikel 1

Iklan Tengah Artikel 2

Iklan Bawah Artikel